In my team we’re using Docker a lot, especially in pair with testcontainers. When we’re running functional tests locally, there might be spinned up localstack, WireMock, Postgres and a container with the service itself. Running them all at the same time as well as the tests might heat up your laptop a lot, as well as make it next to unusable for quite some time. Luckily, thanks to having Linux on my laptop, this issue can be solved using CGroups.
Why using CGroups when you can limit resources per container with Docker?
Indeed, you can limit resources available to a container with command line arguments, or using docker-compose, but with both of those options you’d have to do that for every container. Furthermore, Linux will apply the limits not only when you run the containers locally, but most probably even when you run them in a CI environment. While with CGroups you can make sure that any container you run locally will never exceed the resources you’ve made available for Docker.
So, what are CGroups?
According to Wikipedia:
cgroups (abbreviated from control groups) is a Linux kernel feature that limits, accounts for, and isolates the resource usage (CPU, memory, disk I/O, network, etc.) of a collection of processes.
https://en.wikipedia.org/wiki/Cgroups
You can think of CGroups as of a way to throttle resources available to different processes in Linux.
In our case we’re interested in limiting CPU and memory available to Docker, though you can actually limit with it such things as disk I/O, network I/O and many more. You can familiarize yourself with available options here.
Since most of the modern Linux distributions use Systemd to manage daemons, I’ll be using it here as well to configure resource limits for Docker. Though, Systemd has it’s own term for CGroups – slices. So, if you imagine your system resources being a nice big pizza (uh-oh, now I want one), then one of it’s slices – is what going to be available for Docker to consume.
Since I’m using Ubuntu on my laptop, I’m going to use Ubuntu-specific commands in the following examples, though, the configuration shouldn’t be much different for other distributions.
Setting up an environment
Notice: if you don’t want to test it and want to just configure it, feel free to jump to the configuration part.
Since you’re reading this article, I’d assume that you already have Docker installed and ready.
First, we want to make sure that our set up will actually work. To do that we’d need a container that would be our resource hog for testing.
Let’s create a folder in the home directory and create a Dockerfile there:
~$ mkdir dockerstress
~$ nano ./dockerstress/DockerfileCode language: Bash (bash)
and put the following content into it:
Dockerfile
FROM alpine:latest

ENV STRESS_VERSION=1.0.4

RUN \
  apk add --update bash g++ make wget && \
  cd tmp && \
  wget https://fossies.org/linux/privat/stress-${STRESS_VERSION}.tar.gz && \
  tar xvf stress-${STRESS_VERSION}.tar.gz && rm stress-${STRESS_VERSION}.tar.gz && \
  cd stress-${STRESS_VERSION} && \
  ./configure && make && make install && \
  apk del g++ make curl && \
  cd / && \
  rm -rf /tmp/* /var/tmp/* /var/cache/apk/* /var/cache/distfiles/*

ENTRYPOINT ["/usr/local/bin/stress"]
Code language: Dockerfile (dockerfile)
Next we need to build it:
~$ docker build -t dockerstress ./dockerstressCode language: Bash (bash)Ok, now that I’ve built the resource hog, let’s see what it can do:
~$ docker run -it --rm dockerstress --helpCode language: Bash (bash)The options we’re interested in are: -c, -m and --vm-bytes.
I have 8 CPU cores and 16 Gigs of RAM on my laptop, so I’m going to run the container with the following arguments:
~$ docker run -it --rm -d dockerstress -c 8 -m 1 --vm-bytes 300M -t 30sCode language: Bash (bash)That command will run the container in background, spinning 8 processes and loading all 8 cores by 100%.
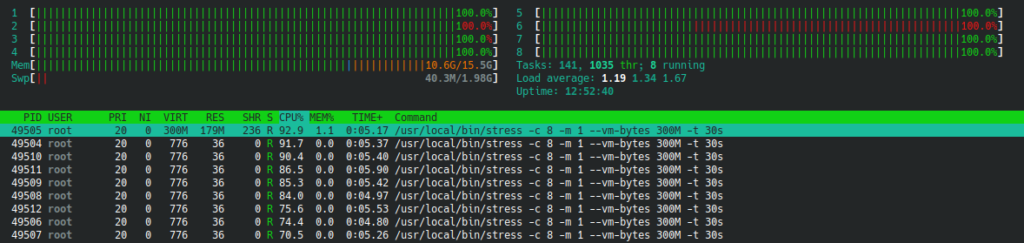
So, the stress test works. Now, let’s configure a resource slice for Docker!
Defining a Systemd slice aka CGroup
First, let’s define the slice itself:
~$ sudo nano /usr/lib/systemd/system/dockerlimits.sliceCode language: Bash (bash)Slice definition:
[Unit]
Description=Slice used to run Docker containers. Memory and CPU restricted
Before=slices.target

[Slice]
CPUQuota=200%
MemoryMax=500MCode language: Properties (properties)
The CPUQuota value seems a bit off here, right? The thing is:with this value defines the percentage of CPU time that can be spent by processes running within the slice. By default each process can use up to 100% of CPU time per core. So, since my laptop has 8 cores, it means that each process can use up to 800% of CPU time. By setting the CPUQuota value to 200%, I limit CPU time available within the slice. It doesn’t mean that the processes within the slice would only be able to use 2 cores, the load might be spread evenly between all 8 cores, but should not exceed 200% of time spent calculating. Though, it is possible to make only certain cores available to the slice using AllowedCPUs parameter, I prefer to not do that, since you can’t be sure that no other processes will be scheduled to the same cores. Not to mention that it is less effective in case of a low load in general.
Next we need to configure Docker to use the slice:
~$ sudo nano /usr/lib/systemd/system/docker.serviceCode language: Bash (bash)Put a new line with the slice right where the [Service] block begins, like this:
[Service]
Slice=dockerlimits.sliceCode language: Properties (properties)
Also, you need to add --cgroup-parent=/dockerlimits.slice/ argument to the ExecStart property value, like this:
ExecStart=/usr/bin/dockerd -H fd:// --containerd=/run/containerd/containerd.sock --cgroup-parent=/dockerlimits.slice/Code language: Properties (properties)‼️ Starting with Ubuntu 21.10 parent cgroup should be specified without slashes, like this:--cgroup-parent=dockerlimits.slice
Then save the file, and run the following commands:
~$ sudo systemctl daemon-reload
~$ sudo systemctl restart dockerCode language: Bash (bash)
Now let’s check Docker’s status to make sure that the configuration got applied:
~$ sudo systemctl status docker
● docker.service - Docker Application Container Engine
     Loaded: loaded (/lib/systemd/system/docker.service; enabled; vendor preset: enabled)
     Active: active (running) since Tue 2020-09-15 22:38:59 CEST; 1min 0s ago
TriggeredBy: ● docker.socket
       Docs: https://docs.docker.com
   Main PID: 50470 (dockerd)
      Tasks: 17
     Memory: 47.8M
     CGroup: /dockerlimits.slice/docker.service
             └─50470 /usr/bin/dockerd -H fd:// --containerd=/run/containerd/containerd.sock --cgroup-parent=/dockerlimits.slice/Code language: Properties (properties)
As you can see, the Docker service uses it’s own CGroup docker.service that is a part of dockerlimits.slice now. Docker now also use the same slice as a parent CGroup for all the containers.
Let’s check it using our resource hog container!
~$ docker run -it --rm -d dockerstress -c 8 -m 1 --vm-bytes 300M -t 30sCode language: Bash (bash)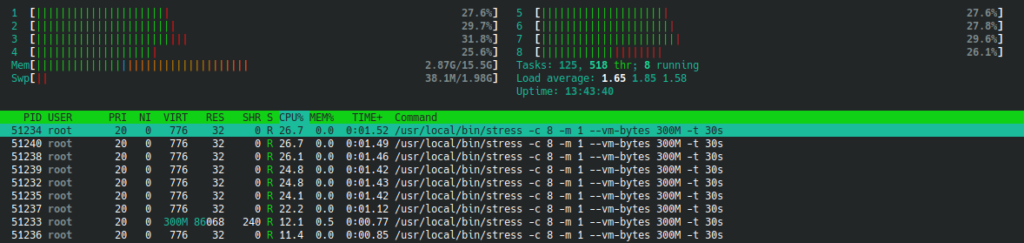
As you can see, even though there are still 8 stress processes running, the load is way less than before.
And what about memory? I’ve set the limit to 512MB. Let’s try running the container with vm-bytes argument set to 1024M, like this:
~$ docker run -it --rm -d dockerstress -c 8 -m 1 --vm-bytes 1024M -t 30sCode language: Bash (bash)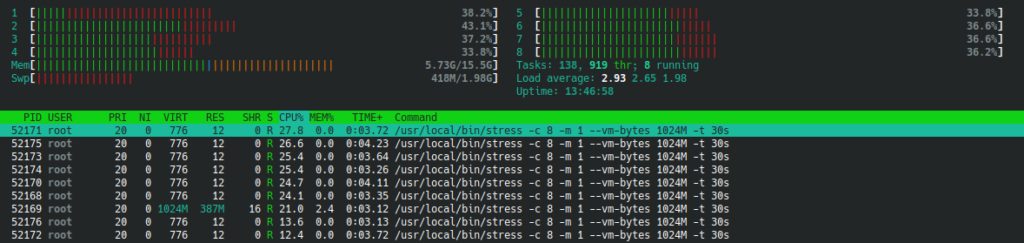
Can you notice the difference? Look at the Swp value – it started to grow. That is because our containers can’t use more than 512MB of physical memory now. Fancy, ain’t it?
As for my setup (8 CPU cores, 16 Gigs of RAM), I prefer to limit CPU time to 500% and memory to 12GB, so the laptop keeps being usable even during a heavy Docker load. Now I can keep using my IDE even while I run functional tests.
Hope you find it useful!
[1] Asish Soudhamma, Docker limit resource utilization using cgroup-parent: https://medium.com/@asishrs/docker-limit-resource-utilization-using-cgroup-parent-72a646651f9d
[2] Glauber Costa, Isolating workloads with Systemd slices: https://www.scylladb.com/2019/09/25/isolating-workloads-with-systemd-slices/


